Lifebuoys and Life Jackets
The National Scout Boating Rules require that every boat manned by Sea Scouts shall carry a lifebuoy within easy reach of the coxswain. The way in which this lifebuoy is thrown and the way to use it are shown on the previous page.
The National Sea Scout Rules further require every member of a sailing boat’s crew to wear a life jacket. This is important and may save your life, so choose a strong type that will stand up to wear and which conforms with N.Z.S.S. 5823; 1982. “Life jackets for use in sheltered waters”.
Most new jackets are reliant on closed cellular rubber foam for buoyancy.
If it is kapok filled (kapok is a water-resistant fibre and very light), keep it dry. Do not use them as cushions — this compresses the fibres and reduces their efficiency. The kapok is enclosed in an oil-tight inner plastic covering.
Keep it clear of snags and nails. See it has as many airtight sections as possible.
Use only a type which will keep the wearer’s head above water should they be unconscious. Remember a jacket incorporating skirt and sleeves will help combat cold and risk of exposure.
If the jacket does not have long sleeves and waist protection a parka, which need not be worn at all times, must be carried. Inflatable types are not recommended for Sea Scouts.
All members of the sailing crew should have a seaman’s knife, a single-bladed knife with folding blade and a marline spike on the back secured to a lanyard worn round the waist. The lanyard should have a small eye at one end which can be passed over the wrist when working outboard, or in the event of a capsize to ensure the knife is not lost if accidentally dropped.
Avoid Overloading
Care must be taken to see that the boat is not so overloaded with stores or passengers as to hinder the free working. The maximum numbers which may be carried in a Standard under oars is 10 and under sail seven. When loading the boat with stores, care must be taken to keep heavy weights from the ends of the boat or it will be sluggish rising to the waves and may bury the bows heading into the sea or be pooped by a following sea. Stow the heavier gear low-down amidships, keeping the boat trimmed slightly by the stern.
Rescue Breathing
Don’t Waste Time—Begin at Once
Place the victim on their back and begin rescue breathing. Your first blowing efforts will show if the air passages are blocked and, if they are clear, will provide the urgently needed oxygen. If the throat is blocked, clear it quickly with your fingers. Slaps between the shoulder blades should dislodge a stubborn blockage.
Rescue breathing through the patient’s nose is less likely to force air into the stomach. If the nose is blocked, however, try rescue breathing through the mouth.
In an unconscious person with the head slumped, the tongue blocks the throat and little or no air can get into the lungs. Lift their neck and tilt the head right back—half-way tilt is not enough — and they may start breathing for themselves. If they do not, start rescue breathing.
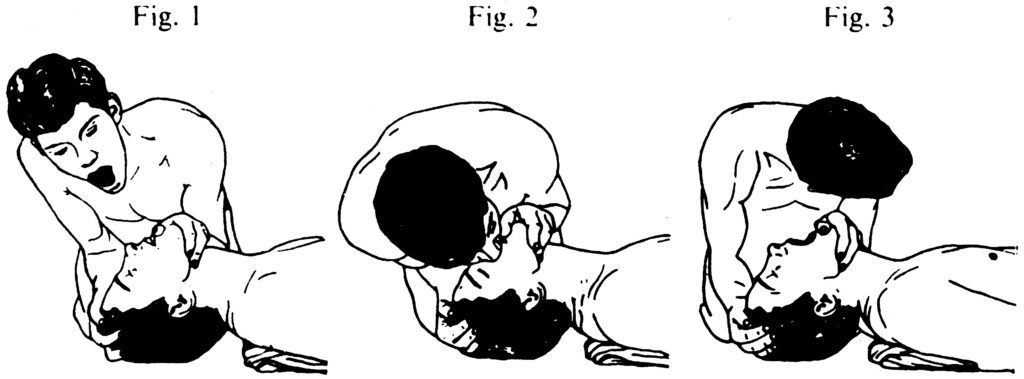
Hold the head fully tilted with chin pulled forward. Take a deep breath, open your mouth wide (fig. 1), and seal your lips on the cheeks round the nose, keeping the mouth closed and taking care not to pinch the nostrils (fig. 2).
Then blow until you see the chest rise. If you are rescue breathing through the mouth, seal your lips round the opened mouth, blocking the nostrils with your cheek —or pinching them with your fingers —to prevent air leakage.
Remove your mouth and listen to them breathing out through mouth and nose—part their lips if you are breathing through their nose— while you are taking another breath (fig. 3). Inflate their lungs again as soon as they have breathed out.
Use only puffs from your cheeks for infants. Stop blowing as soon as the chest starts to rise. Repeat breaths at least 20 times a minute.
Make the first 5 to 10 breaths deep and rapid. Then continue with 10 to 15 breaths a minute. When they start trying to breathe for themselves, keep your breaths in time with their efforts.
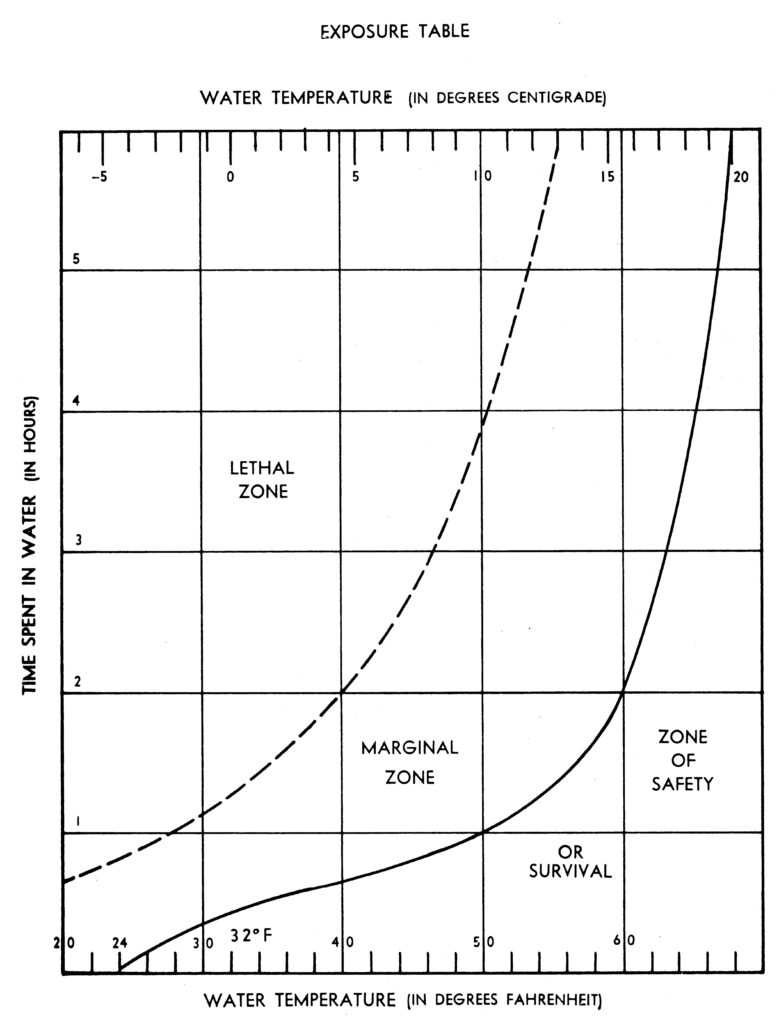 A close look at the exposure table will show that exposure in cold water can kill, and kill quickly. We often hear of fit, healthy young people dying from exposure. Then we find that they usually had inadequate clothing to protect them from cold weather, the victims passing from consciousness to unconsciousness to death very quickly. Leaders and Charge Certificate holders must remember that as cold on mountains kills, so can immersion in cold water, exposure often causing death, instead of drowning.
How can we fight exposure caused by immersion in water? Stay ashore! This is not the spirit of Sea Scouts, so all reasonable precautions must be taken when sailing in cold conditions. Wearing an approved life jacket, even one with a skirt, is not enough. The body can lose a lot of heat through the limbs, and these should be covered. Woollen clothing should be worn next to the skin. Woollen underwear, jerseys, bush shirts, long trousers, socks and sand shoes, towel round neck and waterproof yachtsman’s parka and trousers are all garments which will help to keep a person warm in water. Woollen clothing is good as it insulates the body by reducing the circulation of cold water over the skin and keeps the layer of water next to the skin still, giving it time to warm up.
Rubber wet suits are often used as they are better than woollen clothing.
Fresh water lakes are usually much colder than saltwater harbours at any time of the year, and the risk of death by exposure is much greater. Do you know what the water temperature at your boat shed is? Compare it with the table some time and make sure when you go sailing in cold conditions that all your crew is adequately dressed so if you do capsize, and rescue is slow in coming you all have a chance of survival.
Distress Signals
When a vessel or seaplane on the water is in distress and requires assistance from other vessels or from the shore, the following shall be the signals to be used or displayed by her, either together or separately, namely:
- A gun or other explosive signal fired at intervals of about a minute:
- A continuous sounding with any fog-signal apparatus:
- Rockets or shells, throwing red stars fired one at a time at short intervals:
- A signal made by radiotelegraphy or by any other signalling method consisting of the group . . . _ _ _ . . . in the Morse Code:
- A signal sent by radiotelephony consisting of the spoken word “Mayday”:
- The International Code flag signal of distress indicated by flags N.C.:
- A signal consisting of a square flag having above or below it a ball or anything resembling a ball:
- Flames on the vessel (as from a burning tar barrel, oil barrel, etc.):
- A rocket parachute flare or hand flare showing a red light.
- A smoke signal giving off a volume of orange coloured smoke.
The use of any of the above signals, except for the purpose of indicating that a vessel or a seaplane is in distress, and the use of any signals which may be confused with any of the above signals, is prohibited. For small boats within sight of shore or other boats, a good “I need help” signal to adopt is that of slowly and repeatedly RAISING AND LOWERING ARMS OUTSTRETCHED TO EACH SIDE. This is a distinctive signal not likely to be mistaken for a greeting. To be as effective as possible the signal should be given from the highest vantage point on the boat, with consideration being given to colour contrast. This signal is more effective if articles of white clothing are held in each hand.

If you see or hear any of the above, inform the police immediately and give all possible assistance. Emergency telephone number 111 or local police number.
NOTE
Scouts Aotearoa Policy 143: National Water Activities Policy contains rules and guidelines that cover boating and other aquatic activities.