Standard Boat Construction
The New Zealand Sea Scout Standard boat was designed in 1944 by the firm of Miller and Tunnage Ltd., of Dunedin, to the order of the Dominion Commissioner for Sea Scouts, Mr A. J. Black. The firm were asked to design a boat similar to the Royal Navy’s 16-foot skiff and the “Standard” is the result of their efforts.
Up until this time Sea Scouts used almost anything which would float, and this included a large number of ex-naval whalers and gigs, which had become very hard to acquire and too expensive to build, apart from which they were rather heavy for the smaller lads to handle.
The first two Standard boats to be built were completed in time to be used at the Picton Regatta in January 1945. One of these, the Takitimu, was built by the designers in Dunedin and the other, the Rodney, was built in Auckland. Since then boats have been built in yards all over the country, including the Naval dockyard, which is building the boats for Sea Cadets units.
Briefly, the Standard is a 5.2 m long, 1.5 m beam clinker built open rowing and sailing boat. In clinker-built boats the planks run fore and aft with the lower edge of one plank overlapping outboard, the upper edge of the plank below it. The planks are fitted to the timbers of the boat and to each other by copper nails which are clenched over washers called “roves”. For single skinned boats this is a strong and light method of construction and is also comparatively easy to repair because a damaged plank may be removed and replaced without unduly disturbing the adjacent planks. In 1966 a mould was taken from a Miller and Tunnage boat and the hull reproduced in fibreglass. These hulls have become very popular and are being used alongside the wooden boats.
Principal Parts of a Standard Boat
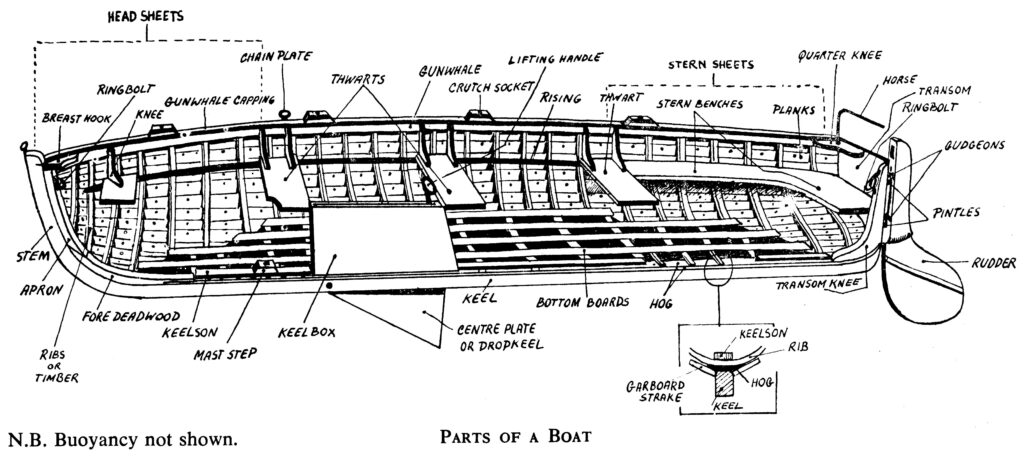 Apron: A piece of wood fitted to the after side of the stem and extending throughout its length, to which are secured the forward ends of the planks.
Benches: The seats fitted round the sides and after end of the stern sheets. (See “Stern Sheets”.)
Bilge: The space between the bottom of the boat and the floorboards.
Bilge Rails: Lengths of wood fitted along the outside of the turn of the bilge.
Bottom Boards: Slats of wood which form the flooring of the boat. They can be removed if required. (See also “Floorboards.”)
Breast Hook: A piece of wood of the thickness of the gunwale and grown to shape, which is fitted to the curve of the gunwale in the eyes of the boat where they join the apron and so serves to strengthen the bows of the boat.
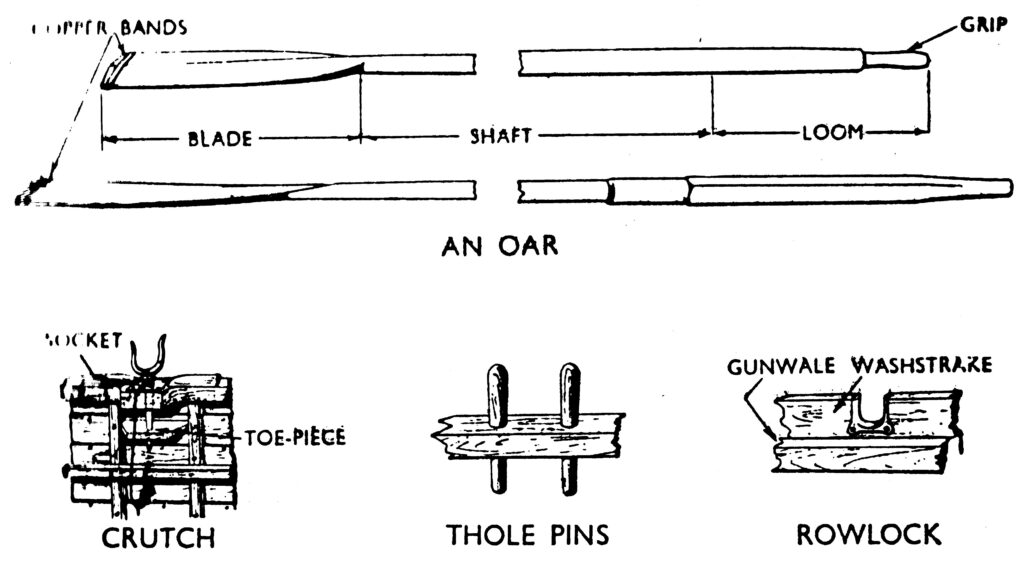
Capping: A strip of timber which is fitted to the top of the gunwale or washstrake to strengthen and protect it. At intervals it is pierced to take the sockets for the crutches.
Centre-Plate or Dropkeel: A metal plate which can be lowered through a slot in the keel so that it projects below the boat and thus checks the leeway when under sail. It is housed in a wooden casing known as the “keel box” or “centre case”.
Counter: The overhanging part of a square-sterned boat.
Deadwood: The piece of timber which joins the apron to the hog thus strengthening the joint between the stem and the keel or the sternpost and the keel.
Eyes: The foremost part of the boat just abaft the stem.
Floorboards: These consist of removable gratings or planks which form a platform over the bottom of the boat extending from the head sheets to the stern sheets. Some Standard boats are fitted with floorboards in the head and stern sheets only and have bottom boards between them.
Garboard Strakes: The line or strake of planks which runs next to and on either side of the keel.
Gudgeons and Pintles: The fittings by which the rudder is hung and pivoted to the transom. The pintle is the vertical pin, and the gudgeons the horizontal eyebolts into which the pintle fits.
Head Sheets: The space in the bows of the boat between the stem and the bow thwart.
Hog: The length of wood fitted to the upper part of the keel. With the keel and deadwood, it provides the anchorage for the inner edges of the garboard strakes and the lower ends of the timbers. It also serves to strengthen the keel.
Keelson: A length of wood fitted to the upper part of the hog. The inboard edges of the floorboards are secured to it. Some Standards do not have a separate keelson but incorporate it with the bottom boards.
Knees: Wooden fittings which secure the thwarts to the side of the boat.
Mast Step: A piece of wood shaped to take the heel of the mast and fitted to the keel.
Number: All standard boats are registered with N.H.Q. The number is carved in the transom on the starboard side or otherwise permanently affixed. It is also carried on the mainsail in numerals 30 cm high and of black material 0.65 cm in width.
Plug: A wooden bung, cork, or screwed metal plug which fits into a hole bored into one of the garboard strakes for draining the boat.
Risings: (see “Stringers”).
Rubbers: Strips of wood extending from the stem to transom outside the washstrake. They protect and strengthen the top strakes.
Sockets: Round holes in the capping and gunwale lined with metal to take the crutches.
Stem: The foremost vertical member of the hull, the lower end of which is scarfed to the keel.
Stern Sheets: The space extending from the stroke thwart to the transom, and round the sides and after end of which are built the stern benches.
Strakes: Lengths of planking which in clinker-built boats extend parallel with each other from stem to stern.
Stretchers: Adjustable wooden bars fitted athwart the bottom boards to provide footrests for the oarsmen.
Stringers: Lengths of wood extending fore and aft over the timbers to which they are fastened. The stringers which support the thwarts are called “risings”; these are the only stringers fitted in a Standard boat.
Thwarts: Benches fitted athwart the boat on which the oarsmen sit.
Timbers: Curved pieces of wood which extend upward from the keel at short intervals throughout its length. Frequently called “ribs”.
Top Strake: The uppermost strake of a boat’s planking.
Transom: A board which is fitted to the after side of the stern post and extends to each side of the boat. The after ends of the planking are fastened to it.
Transom Knee: A piece of wood grown to shape which fits between the hog and transom of a square-sterned boat. It is extended almost the full height of the transom in a Standard boat and also serves as a sternpost.
Fittings
 Boat’s Cable: A length of 30 mm rope by which the boat rides when at anchor. Usually, 20 meters in length and rove through the stem ringbolt and secured to the foremost thwart.
Buoyancy: 1.5 cu. m of buoyancy is fitted at the bow and stern of the standard boat. It is usually made of polystyrene or polyurethane foam blocks or could be made of copper tanks. The buoyancy is fitted to give the boat a greater safety margin in the event of swamping or capsize. Fibre Glass boats have the buoyancy built into the hull and thwarts.
Chainplates: 15 cm metal eye plates fitted to the stemhead and the outside of the top strake to take the forestay, shrouds and runners.
Cleats: Shaped pieces of wood or metal on which the halyards and runners are belayed.
Crutches: U-shaped fittings which fit into meal sockets in the gunwale and are always secured in the boat by a lanyard.
Horse: A curved bar of brass, fitted along the top of the transom to which the block of the mainsheet is shackled; the block travels from side to side of the horse when the boat is put about.
Mast Clamp or Bracket: A metal clamp or bracket fitted to the mast thwart for clamping the mast in position.
Painter: A length of stout cordage (generally 30 mm) secured to the fore ringbolt and by which the boat is secure when alongside or at a boom.
Ring Bolts: Eyed bolts with a ring through the eye clenched through the stem and the sternpost.
Sternfast: A rope similar to the painter, secured to the after ringbolt for marking fast the stern of the boat.
Checking the Equipment of a Standard Boat under Oars
Before taking away a boat the coxswain should see that all the equipment is correct.
- The plug should be securely inserted in its hole.
- There should be a full complement of oars and one spare. Blades forward in a double banked boat, looms secured.
- There should be a full complement of crutches and one spare, all secured to the boat by their lanyards.
- A stretcher should be fitted for each oarsman.
- The rudder should be shipped and the tiller secured with its pin.
- The painter and sternfast should be secured and coiled down.
- The inboard end of the anchor cable should be passed through the fore ringbolt and secured to the foremost thwart. If the boat has a fairlead fitted on the gunwale it will not be necessary to lead the cable through the ringbolt.
- Bailers and fenders should be secured to the boat by their lanyards.
- The boat hook should be handy to the bowman forward and the lifebuoy on the bottom boards aft within easy reach of the coxswain.
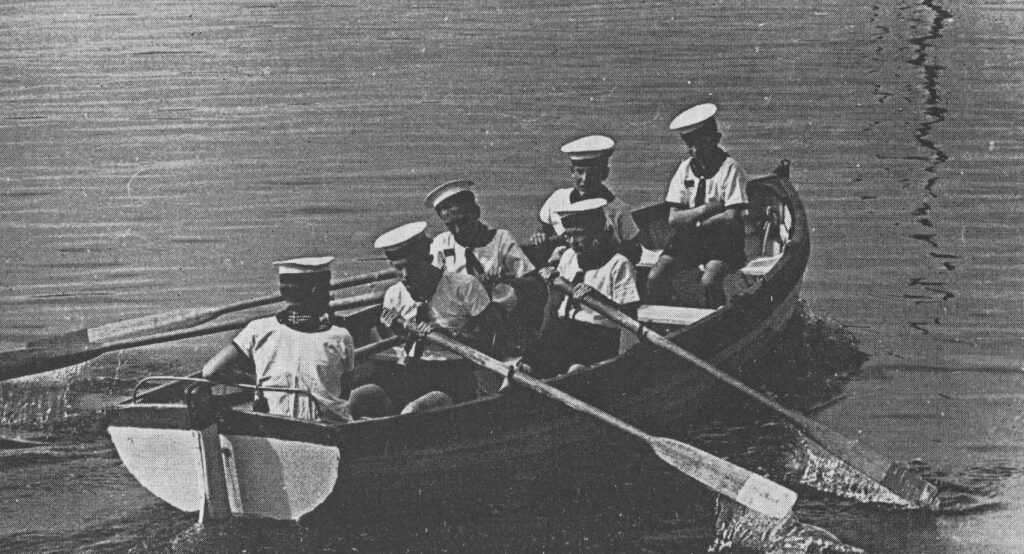
It is an old Navy saying that a ship is known by her boats, and this is equally true of Sea Scout Troops. When away in a boat, remember that you carry the credit of your Troop with you. See that the crew man the boat smartly and that they are properly dressed and the boat’s gear neatly stowed.
No member of the crew should be allowed to stand in the boat except when necessary to carry out his duties, and the crew should be warned against placing hands or arms on the gunwale, especially when coming alongside.
If the boat is to be away from H.Q. for the day it is a good plan to carry a “Boat’s Bag” containing gear to enable minor running repairs to be carried out if necessary. It should include the following:
- Palm and needle
- Sailmakers twine
- A hammer
- A spare plug
- A pair of Semaphore flags
- Dynel cloth, tape
- Red hand flares, orange smoke float, and day glow square of plastic sheet
- Marline spike
- Spare cordage
- Some copper nails
- A torch
- Copper tacks
- Fibreglass resin
Instruction in Boat Pulling
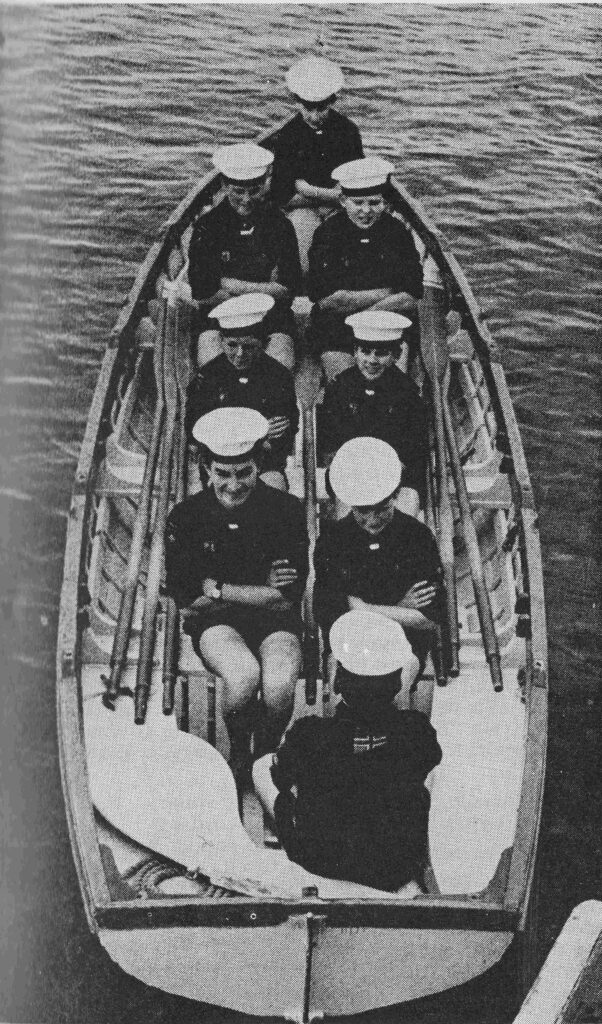
The crew should be detailed off for their thwarts before manning the boat. There are three basic arrangements of oarsmen for four, five or six rowers respectively as illustrated.
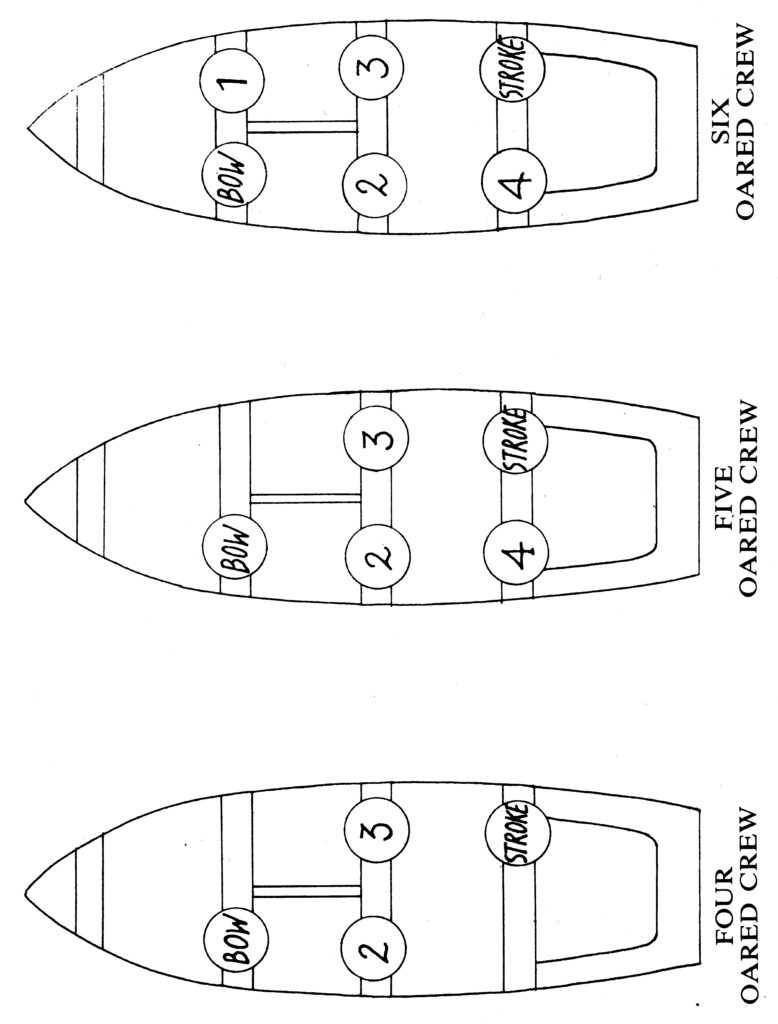
It will be noted that Stroke is always the aftermost oarsman on the starboard side and that the numbering of the positions of other oarsman does not alter with changes in the sizes of crews.
Only in the case of a 6 oar crew are two bow oars carried. This is also a convenient arrangement of rowers for Patrol cruises.
If during rowing instruction it is desired to distinguish between the bow oars, number the starboard bow oar one, the general rule of odd numbers, starboard; even numbers, port.
When boarding the boat the crew should be taught to (not jump) on to the thwarts or benches, thence on to the boards; they should also be taught to avoid stepping on to the gunwale, to move carefully in the boat, and to step over thwarts and not jump from thwart to thwart.
The crutches should be unshipped, fenders out and oars squared off at the stroke thwart, blades forward.
Each rower should sit squarely and upright on their thwart with the after edge of the thwart where their buttocks meet thigh muscles. The stretcher should be adjusted so that when their feet are resting on it, the knees are slightly bent.
Getting Under Way in a Standard
 From Alongside: At the order “Bear off” the bowhand bears the boat off and the near side crew on the stroke thwart springs the boat ahead.
From a Boom: If at an inner berth order the bowhand to bear off by pushing the boat astern to clear the other boats alongside. At an outboard berth order the bowhand to spring the boat ahead.
From a Buoy: Order the bowhand to “Let go”. Have the remainder of the crew at “Oars” to immediately be able to get under way.
In Fenders: Bring fenders inboard.
Ship Crutches: Place the crutches in their sockets.
Sight Your Oars: Each rower grasps their oar (stroke oarsman outboard oars) and raises the blade to the gunwale.
Toss Oars: The oars are raised smartly to a vertical position with the looms resting on the bottom boards—blades fore and aft.
Oars: The oars are lowered gently into the crutches, care being taken not to allow the blade to touch the water. The crew sit squarely and upright on their thwarts with the oars horizontal and blades “feathered”, i.e., parallel with the water. NOTE: When given under way “Oars” is an order to stop rowing and assume the position described above. Give Way Together: is then ordered.
In a tideway it may be necessary to have the crutches shipped and the oars tossed before ordering the bowhand to bear off to avoid the boat being carried away by the tide.
These orders are given in rapid sequence and are executed in precise unison by the crew.
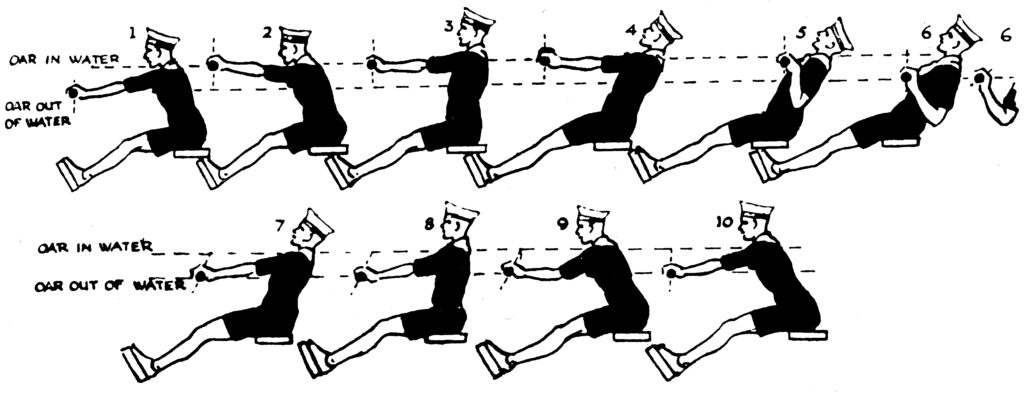
In all methods of rowing the oar is pivoted at about one-third its length from the grip, and is used as a lever by dipping the blade in the water and pulling on the loom, thus driving the boat through the water.
The sequence of body and arm movements is shown in the accompanying illustration.
The hands should grasp the oars about 30 to 45 cm apart, the inner hand on the grip. The grip on the oars should be firm but light, fingers on top, thumb underneath. Both elbows should be kept close in to the body and the back straight.
At the commencement of the stroke the rower leans forward keeping the shoulders braced back. Then lowers the blade of the oar into the water by raising their hands, then pulls the blade aft through the water by driving their feet against the stretcher and, while keeping the back and arms straight, swinging the trunk of their body backwards until it is from 10° to 20° beyond the vertical. The end of the stroke is made with the trunk still in this position by bending the elbows and pulling the loom of the oar on to the chest with the arm and shoulder muscles, which should bring the oar with the blade just clear of the water at an angle of 45° with the vertical.
From the moment the oar enters the water, and throughout the stroke, the legs should exert a powerful drive against the stretcher.
The cycle is completed by lowering the hands slightly to make sure the blade clears the water, dropping the wrists to feather the blade. The arms are then thrust forward and the trunk swung upright by the stomach muscles.
The crew should reach well aft at the commencement of the stroke and raise the wrist so that the blade of the oar presents the correct angle to the water. The catch should be made exactly together, with as much weight as possible on the looms of the oars, and the arms should be kept straight until the body reaches its backward position. If this is done correctly the oars will come home easily at the end of the stroke.
There are then four parts to a complete stroke:
- Leaning forward and lowering the blade in the water ready to start the pull.
- The sweep of the blade toward the stern to give the headway.
- Raising the blade out of the water and turning it flat (feathering).
- Swinging the oar back to position for the next stroke. Be careful not to make this recovery too rapidly. Give the crew time to breathe correctly.
Pulling Orders
When a pulling boat is under way, any order to the crew except “Hold water” is obeyed on completing one full stroke after the order is given.
All such orders should be given at the moment when the blades of the oars are in the water. Obeying the order the crew should take their time by the stroke oars.
When “Port” or “Starboard” is included in the order it refers to the bank of oars on the port or starboard side of the boat respectively, i.e., “Give way port” if only the port bank of oars is required to give way.
“Back together” is the order to back water together by pushing on the looms of the oars instead of pulling (or “Back port” or “Back starboard”).
“Easy all” is the order to pull less vigorously so that the speed of the boat will be reduced. If the boat is being turned, “Easy port” or “Easy starboard” may be given. To resume pulling the order “Give way together” is given.
“Stroke together” is the order for all to give one stroke together.
“Oars” is the order to stop pulling which is given when the oars are about to be boated or tossed. NOTE: If the oars are not to be boated or tossed the order “Oars” is given; for example, when ordering “Rest on oars”. This order allows the crew to relax by laying their oars athwart the boat with the grips on the gunwale, blades flat. (With a heavier oar, such as is used in naval whalers and cutters, the grip is slipped under the gunwale, the weight of the outboard end of the oar holding it in place.)
Oars, crutches, etc., are “shipped” when placed ready for use and “boated” when stowed away in the boat.
“Mind your oars” is a warning to the crew to keep the blades of their oars clear of some obstruction (“Mind your port oars” —“Mind your starboard oars”).
“Eyes in the boat” is an order to the crew to keep their gaze from wandering abroad and to pay attention to the job. There is tendency with new Scouts to watch the blade of the oar, which should be discouraged at an early stage.
Going Alongside in a Standard
When the boat is within 50 metres or so of her destination the order, “Fenders out”, is given, followed by the order, “Bows”. At this the bowhand tosses their oar and then boats it, passing the loom aft.
The bowhand then stands in the head sheets with the boat hook vertical and stands by to fend off the boat. They should also make sure the painter is clear and ready to be made fast.
Then the order “Oars” is given, followed by “Toss oars” and “Boat oars”, at which order the oars are lowered gently into the boat, stroke oars nearest gunwale, blades forward and squared off at the stroke thwart. The crew then unship their crutches and the stroke stands up in the stern sheets ready to fend off or check the way and make fast aft.
Where there is insufficient height for the oars to remain tossed the order, “Toss and boat your oars”, is given after “Oars”. The oars are tossed and held vertically for an instant and then laid in together.
Oars are never tossed when going alongside in heavy sea or swell in case the blades of the oars catch under some projection and drive the loom through the bottom.
Under such conditions “Oars”—“boat your oars”—is given and the oars are lifted clear of the crutches and the blades the swung forward in a horizontal arc and as the oars are boated are passed aft.
Making Fast
Learn to make fast by making a knot using a bight in the rope instead of hauling yards of rope through to make a knot at the right length.
If the painter is long enough, pass it round some object (ringbolt, bollard, etc.) ashore and secure it back in the boat.
If the boat is likely to be alongside for long, don’t forget the tide. It’s no fun to return to find the painter secured under water or the boat slung up by its painter.
Towing and Being Towed
Towing and being towed may both be dangerous, and one must realise the dangers in order to guard against them. The dangers are chiefly of the towed boat broaching to and capsizing or of running her nose under and filling. It is essential then that the tow rope should be able to be let go or cut immediately from either end in case of emergency. A knife should be kept handy during these operations.
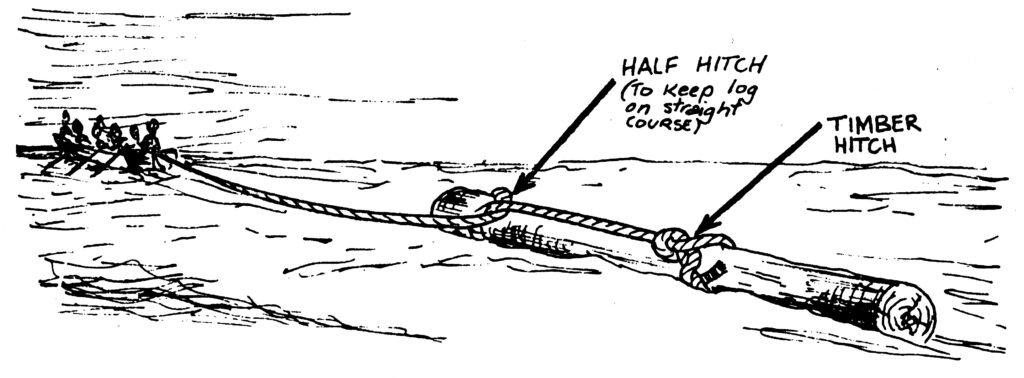
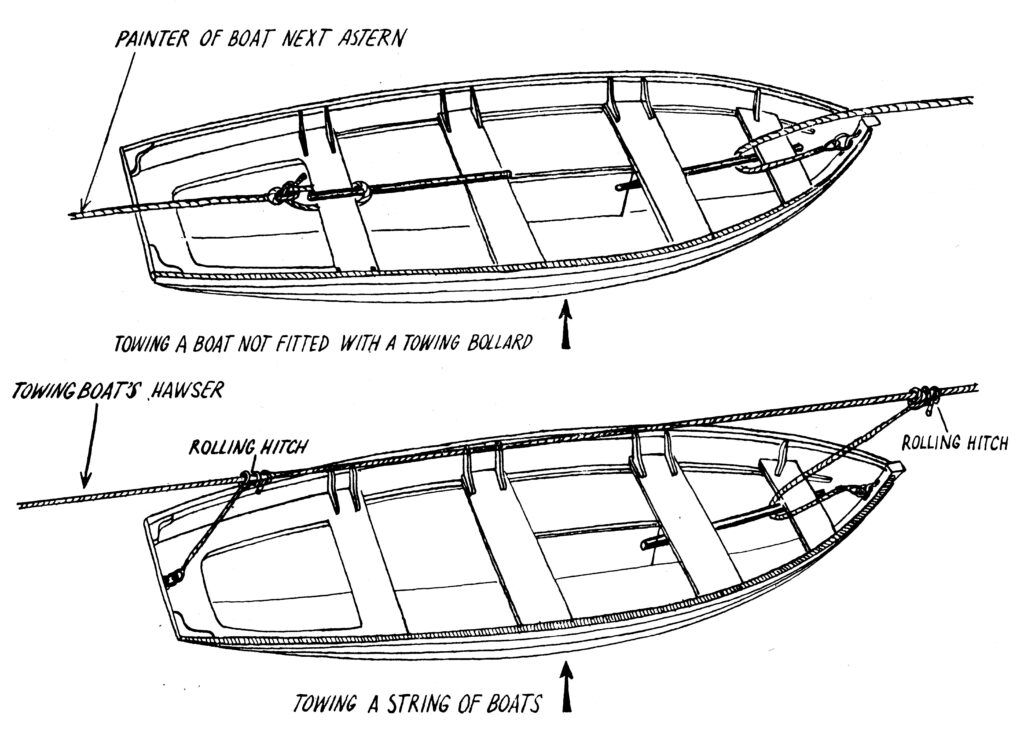
To Tow: The tow rope must be made fast at either end with a knot which can be slipped easily. It is usually made fast amidships so that the vessel can be steered properly. If you are a power vessel take the strain gently so as to avoid breaking the rope or unduly straining the boat being towed. If more than one vessel is being towed one behind the other, the largest boat should be behind the towing vessel and the smallest last. If towing with a Standard boat, make an eye in the tow rope with a bowline and pass the rope inboard under the stroke thwart, bringing it up between the stroke and midships thwart. Pass the loom of an oar or a spar across the top of the thwarts and through the eye so that the row can be immediately slipped by pulling the oar out.
Being Towed: The towing rope must be led directly from the bows and, in the case of a Standard boat, the tow rope should be led in over the bows and passed under the foremost thwart and up between the foremost thwart and the mast thwart. An eye should be made in the tow rope with a bowline as when towing and an oar or spar laid along the top of the thwarts and through the eye so that the rope will slip immediately the oar is withdrawn. Keep the weight aft and have the crew sitting on the bottom boards. The coxswain must steer in the wake of the towing vessel. Never tow directly off the fore ringbolt as this imposes too much strain on the bows. If it becomes necessary to tow by the painter, pass the painter back over the foremost thwart and secure as shown in the illustration.
Sculling
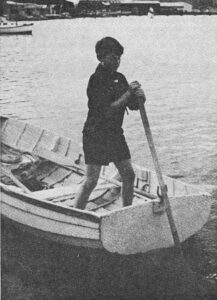 A Sea Scout should be able to scull a dinghy over the stern. The boat needs to have a notch in the transom or a crutch socket fitted to the transom.
Face aft, feet well apart, and for a start hold the oar with both hands, with the wrists under the oar and the thumbs towards you.
Make the strokes without pause, the hands, describing a horizontal figure of eight. Let the wrists work loosely, acting as hinges pulling the hands after them as the strokes are made. If the wrists are allowed to act in this way, the blade of the oar will twist naturally at the end of each stroke and assume the correct angle for the return stroke.
Once the knack has been acquired, sculling can be done singlehanded with either hand.
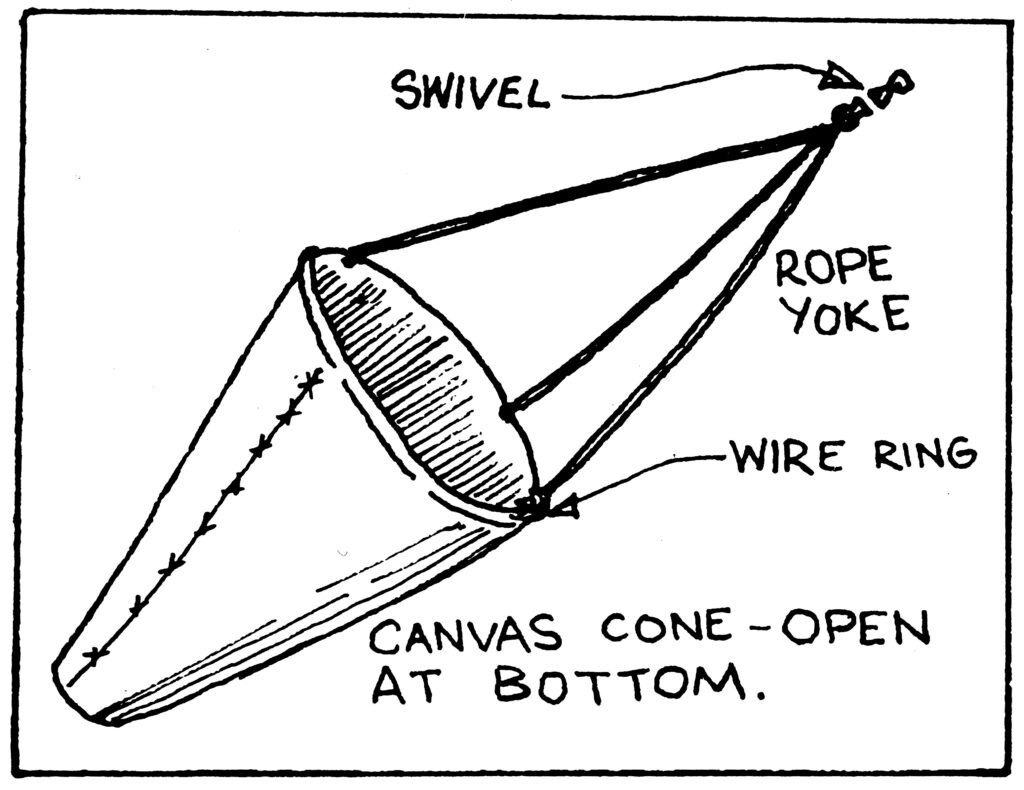
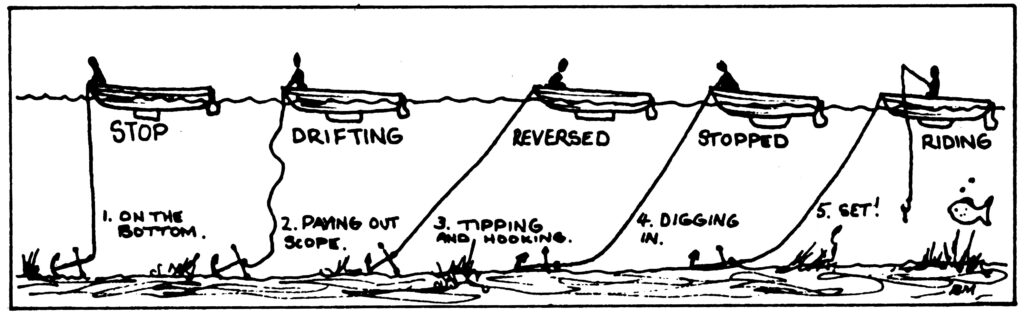
Riding to a Sea Anchor
If a boat is overtaken by a gale and has little sea room it is best to ride out the gale to a sea anchor, which is a cone shaped bag of canvas open at both ends and with one end much larger than the other. It is streamed over the bows secured to the boat’s cable (anchor warp) to the full extent and the boat then rides to the sea anchor with her head to wind and sea as she drags it slowly through the water.
For a Standard the dimensions of the sea anchor will be as follows:
Diameter of the mouth | 40 centimetres |
Length of sea anchor | 70 centimetres |
Diameter of tail | 0.6 centimetres |
The mouth is strengthened with wire to keep it open.
A jury sea anchor can be rigged by securing the foresail by its luff to an oar or spar and weighting the clew with the anchor. Bend a three-legged bridle on to the three corners and secure to the boat’s cable.
If no sails or awnings are available a sea anchor can be made by securely lashing together oars, stretchers, and other such fittings and securing them to the boat’s cable by a two-legged bridle so that the boat will tow them broadside through the water.
Anchors and Anchoring
Ships cannot be anchored where the water is too deep. It is not just a question of whether the cable is long enough to reach the bottom; it is important to remember that an anchor is designed:
To hook firmly into the sea-bed when the cable is pulling straight along the ground from the anchor: and to break out of the ground easily when the cable is pulling above.

 Several types of anchor are available for use with small craft but those most commonly used with Sea Scout boats will be the Stocked anchor of the Admiralty pattern, the stockless Patent anchor and Danforth anchor. Of these the Danforth has the greater holding power, weight for weight. All have the advantage that they can be easily stowed, the Stocked anchor having a stock which can move through the shank after removing the pin and which stows alongside the shank (the reason for the curve in the stock).
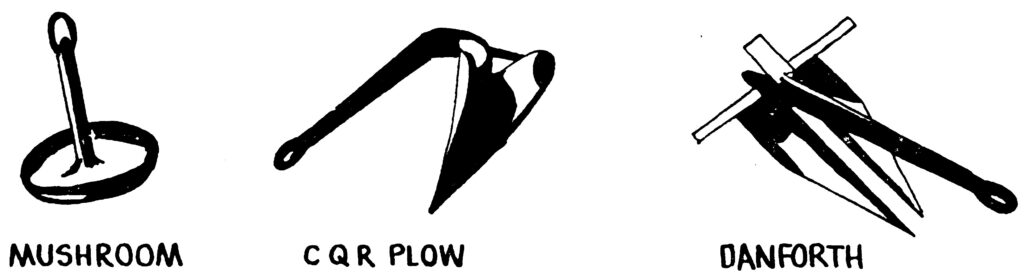 Other useful anchors are C.Q.R. (Plough) and the Mushroom anchor which is used for permanent moorings, in mud it not only buries itself deeply, so that the weight of the mud in the bell adds to its holding qualities, but it actually sets up a suction condition, making it extremely hard to break out.
Points for Guidance when Anchoring
Always make sure the inboard end of the cable is secured aboard the boat. (Many an anchor has been lost overboard with all its cable.)
Always check the depth of water and, if possible, the type of bottom before anchoring. (Clay, mud and sand are good holding grounds; shingle, shell and rock make poor holding ground.)
Don’t choose an anchorage where the water is too shallow—otherwise at low tides you may find yourself aground.
Leave plenty of swinging room. If the boat is swung round by the wind it may strike or chafe against any obstruction.
Approach your anchorage heading into the wind or current, whichever is the stronger. Use moored boats as a guide and turn your own boat in the same direction.
Before the anchor is let go (never attempt to throw it) see that the boat has lost her headway, and backwater. This helps to lay the rope along the bottom. When you have paid out rope to twice the depth of water, snub it and feel the anchor starting to hold, then pay out the require length, which should be about three times the depth of water. Pay out more rope in strong winds.
Make sure your foot is not inside a bight of the rope before you let go.
In a boat under sail it is advisable to drop the foresail as the boat rounds up into the wind and “let fly” the mainsheet.
Wait until you are satisfied the boat is secure. Thereafter check your position regularly.
If it becomes necessary to anchor on a rocky bottom, bend the cable to the crown of the anchor and stop it to the anchor ring or shackle with a seizing of some light line so that if the anchor becomes wedged under a rock, a sharp pull on the cable will snap the seizing and the anchor can be pulled out by its crown.
Refitting
Every year the Group Council and the Patrol Leaders Council have to spend time planning the annual refit of the Troop’s boats to bring them up to top line before survey for the next year’s Boat Certificate of Seaworthiness.
The planning has to cover the extent of the refitting of each boat, which falls into three main categories:
Hull,
Fittings (chain plates, centre plate, horse, floors, etc.),
Equipment (oars, spars, riggings, etc.)
And the hands to do the job. This means making provision for the Sea Scout tackling the Boatswain badge.
The Group Council will need to detail off a Leader and Patrol Leader to make out a full “Defect List” under the categories listed above and Patrol Leaders will be required to supply a list of Scouts wishing to qualify for the badges. With this information the planning can proceed.
The Hull
Preparation: The hull must first be thoroughly scrubbed out and hosed to remove all sand and dirt, particular care being taken to clean out between ribs and planks. All paintwork should then be well washed down with painter’s sugar-soap, and then well washed down to remove all traces of the soap and caustic.
The paintwork can then be sanded down, using a medium grade paper to start with. Broken paintwork must be removed. Sanding down is a long job and a case where many hands make light work. Even the youngest Recruit can help.
Avoid using a blowlamp if at all possible because in unskilled hands the timber can be badly charred, and also the heating of the copper nails tends to loosen the roves. Scrapers and coarse sandpaper on broken paintwork are a safer proposition. See that all sanding is done with the grain or the general run of the planks as cross sanding will take a lot of removing when it comes time to finish off the work with a fine paper. If the paintwork is in good condition sand it down just enough to provide a smooth, even surface.
Painting: Where the preparatory work has exposed bare wood a primer coat of paint must be applied. It is most important that the wood is dry or the paint will not adhere to the surface satisfactorily. When the primer has dried hard, a light sanding with a fine paper will smooth the surface.
The undercoat should be applied next, and this should be a similar colour to the final coat as the two will blend more easily and any knocks later will be less noticeable. When dry, the undercoat can be smoothed, using wet-and-dry paper, and the hull washed down with a turpentine-laden rag and wiped off with a clean rag before applying the final coat.
The final coat will be enamel, and care is to be taken to avoid the coat being applied too thickly, which will cause “curtains” and unsightly runs. Take care, too, to avoid any “holidays”—unpainted patches. It is better to have two thin, even coats than one thick one. Turn the boat upside down on trestles if possible to do the outside of the hull.
Cutting a Waterline: Set the boat on an even keel, decide on the height of the waterline and mark off, using a square to the floor at intervals round the hull. These marks can then be joined up in pencil. Once the waterline has been marked it is a good plan to score it lightly into the hull so that the business of measuring off does not have to be done when next time a repaint is due. Paint the lighter hull colour first, using a masking tape to ensure a straight waterline, unless a “tame” skilled painter is available to help.
Points to remember when painting boats:
Be sure that the surface is clean, dry and free from grease.
Be sure that the atmosphere is free from dust as this will settle on the wet paint, causing a rough surface.
When painting in a salt-laden atmosphere, as is likely in a boatshed over the water or near the sea, be sure that no salt deposit has formed on the surface to be painted. If it has, wipe the area over completely with a turpentine laden rag and wipe off with a clean, dry rag.
Spars
At the end of the boating season the sails will have been removed from the spars, washed and stowed away where air can circulate feely round them. Masts, spars and oars should all be scraped down to bare wood and sanded off. When this has been done a generous coating of raw linseed oil should be worked into the wood. The first coat should be about threequarters linseed oil and one-quarter kerosene to carry the Oil deep into the timber. When dry apply the second coat, which is to be 100 per cent raw linseed oil.
When the oil is dry the spars can be varnished with a clear spar varnish, the varnish being warmed gently before application in thin coats. If two coats of varnish are necessary, Hard wipe clear the surface lightly between coats with turpentine. Hard clear polyurethane varnishes are often used on spars nowadays.
Oars may be varnished but must be well oiled first.
Rigging
All rigging should be inspected periodically for frayed or broken fibres or wires, and wire rope should be well lubricated with boiled linseed oil. Particularly inspect the lower ends of shrouds and stays, and if there is any sign of rust remove the serving over the eye splices, wire brush and treat with boiled linseed oil before re-serving. Removing all shackles from the stayband, wire brush and lubricate with graphite grease. Stainless steel rigging will only require a good inspection.
Replace all lanyards on the stays, check the blocks and masthead sheave to see they are free running, and grease lightly.
Drop-keel
Remove from the centre case and inspect the pin for wear. Scale off all rust and paint with K 16 or some similar rust proofing paint, or fit a stainless steel pin.
Repairs to (G.R.P.) Glass Reinforced Plastic Boats
With the increasing use of fibre glass boats with their relative maintenance free operation, Sea Scouts should be aware that these boats will only be maintenance free if they are looked after very carefully. With use the surface of these boats will become scratched or may become cracked. As the result of an accident, it may have a hole punched in it. Repairs should be done while they are still small; if damage is left it could get worse and harder to patch up. Small repairs can be done by the Sea Scout Group. A large repair job is probably better left to an expert or boatbuilder.
Small scratches may be repaired by first removing any loose material, then cleaning and drying the affected area. An epoxy resin putty is applied to the area, smoothed off and allowed to harden. After hardening it may be sanded smooth. With deep scratches and gouges which are into the laminate layers an epoxy resin is used. The first step is to apply a reinforcing material, depending on the size of the gouge or deep scratch. With large gouges the reinforcing material (usually dynel cloth) should cover well beyond the damaged area. Several coats of resin are laid on. The final coat should be covered by cellophane to give it a smooth finish and stop the resin from undercuring. At all times the manufacturer’s instructions should be followed when using the resin. When the repair has set hard the cellophane is removed and the patch sanded smooth. Patches may be coloured by using tinting pigments. It is very hard to match colours as the hull colour will have faded. An easy way round this is to paint the patched area only. Bad cracks should be repaired from inside the hull where this is possible. Care should be taken that any resin used will not destroy the polystyrene buoyancy if it comes in contact with it.
To keep the hull of your fibre glass boat looking good, clean the boat well inside and out with detergent, then polish the hull well with a good car polish. Don’t leave your boat banging against jetty piles, alongside other boats or lying on a beach banging around in the waves. Always stow the boat on a flat surface and well supported on padded chocks. When the boat is being transported by trailer make sure the chocks are set exactly to the hull of the boat or you may arrive at a regatta ready to win but with your bilges stove in. On no account should you tow more than one boat, and if you are being towed in a group your boat must be attached to the tow line independently; this prevents excessive strain being put on the hull. Looked after carefully a fibre glass boat will give many years of good service.
The Little Scout Book No. 22 “Rules for Water Activities” contains advice on General Boat Maintenance.
Wooden Boats
The older wooden cutters and dinghys can be stripped of paint using blow lamps, gas torches or better still hot air paint stripping guns. When the boat has dried out it can be treated with Evidure or similar compound before painting.
The caulking along the keel and garboard strake can be done using a flexible caulking compound applied with a pressure gun Maintained well your wooden boat will last a long time.